Build a Todo App with Next.js 16 and Supabase (2026 Guide)
In this guide, we’ll build a production-ready Todo App using:
- Next.js 16
- Supabase
- TypeScript
- Tailwind CSS
- Server Actions
- Authentication
- Row Level Security (RLS)
This tutorial focuses more on logic and architecture rather than UI design.
By the end of this guide, you'll have:
- Authentication with Supabase
- Protected routes
- Todo CRUD operations
- Row Level Security (RLS)
- Form validation with Zod
- Server Actions
- Secure session handling
What We’re Building
Our Todo App will include:
- User Registration
- User Login
- Protected Dashboard
- Create Todo
- Complete Todo
- Delete Todo
- Secure Database Access with RLS
Prerequisites
Before starting, make sure you have:
- Node.js installed
- A Supabase account
- Basic understanding of React and Next.js
Folder Structure
proxy.ts
src
├── actions
│   ├── auth.ts
│   └── todo.ts
├── app
│   ├── layout.tsx
│   ├── (auth)
│   │   ├── layout.tsx
│   │   ├── login
│   │   │   └── page.tsx
│   │   ├── register
│   │   │   └── page.tsx
│   ├── (private)
│   |   ├── layout.tsx
│   |   ├── page.tsx
│   |   ├── create
│   │   │   └── page.tsx
├── components
│   ├── form-error.tsx
│   ├── input.tsx
│   ├── loading-button.tsx
│   ├── navbar.tsx
│   └── todo-actions.tsx
├── utils
│   ├── supabase
│   |   ├── client.ts
│   |   ├── proxy.ts
│   |   └── server.ts
│   ├── validators
│   |   ├── auth.ts
│   │   └── todo.ts
Create a Next.js 16 Project
Run the following command:
npx create-next-app@latest todo-app
Choose options according to your preferences.
Recommended setup:
- TypeScript
- Tailwind CSS
- App Router
- React Compiler
src/directory
Now move into the project:
cd todo-app
Setup Supabase
Go to Supabase Dashboard:
Create a New Project
- Click New Project
- Enter project name
- Enter database password
- Select region
- Enable automatic RLS
- Click Create Project
Add Environment Variables
Inside your project Dashboard:
- Under Get Connected section
- Click Frameworks
Copy the environment variables.
Create .env.local in your project root:
NEXT_PUBLIC_SUPABASE_URL=
NEXT_PUBLIC_SUPABASE_PUBLISHABLE_KEY=
Install Supabase Packages
Run:
npm install @supabase/supabase-js @supabase/ssr
We’ll also install Zod later for validation.
Understanding Supabase Clients
Supabase provides two client types:
Browser Client
Used inside Client Components.
Server Client
Used inside:
- Server Components
- Server Actions
- Route Handlers
Create Supabase Browser Client
Create:
/src/utils/supabase/client.ts
import { createBrowserClient } from "@supabase/ssr";

export const createClient = () =>
  createBrowserClient(
    process.env.NEXT_PUBLIC_SUPABASE_URL!,
    process.env.NEXT_PUBLIC_SUPABASE_PUBLISHABLE_KEY!
  );
Create Supabase Server Client
Create:
/src/utils/supabase/server.ts
import { createServerClient } from "@supabase/ssr";
import { cookies } from "next/headers";

export async function createClient() {
  const cookieStore = await cookies();

  return createServerClient(
    process.env.NEXT_PUBLIC_SUPABASE_URL!,
    process.env.NEXT_PUBLIC_SUPABASE_PUBLISHABLE_KEY!,
    {
      cookies: {
        getAll() {
          return cookieStore.getAll();
        },

        setAll(cookiesToSet) {
          try {
            cookiesToSet.forEach(({ name, value, options }) =>
              cookieStore.set(name, value, options)
            );
          } catch {
            // Ignore if called from Server Component
          }
        },
      },
    }
  );
}
Setup Supabase Session Middleware
Create:
/src/utils/supabase/proxy.ts
import { createServerClient } from "@supabase/ssr";
import { NextResponse, type NextRequest } from "next/server";

export async function updateSession(request: NextRequest) {
  let supabaseResponse = NextResponse.next({
    request,
  });

  const supabase = createServerClient(
    process.env.NEXT_PUBLIC_SUPABASE_URL!,
    process.env.NEXT_PUBLIC_SUPABASE_PUBLISHABLE_KEY!,
    {
      cookies: {
        getAll() {
          return request.cookies.getAll();
        },

        setAll(cookiesToSet, headers) {
          cookiesToSet.forEach(({ name, value }) =>
            request.cookies.set(name, value)
          );

          supabaseResponse = NextResponse.next({
            request,
          });

          cookiesToSet.forEach(({ name, value, options }) =>
            supabaseResponse.cookies.set(name, value, options)
          );

          Object.entries(headers).forEach(([key, value]) =>
            supabaseResponse.headers.set(key, value)
          );
        },
      },
    }
  );

  await supabase.auth.getClaims();

  return supabaseResponse;
}
Setup Next.js Middleware
Create:
/src/proxy.ts
import { type NextRequest } from "next/server";
import { updateSession } from "@/utils/supabase/proxy";

export async function proxy(request: NextRequest) {
  return await updateSession(request);
}

export const config = {
  matcher: [
    /*
     * Match all request paths except for the ones starting with:
     * - _next/static (static files)
     * - _next/image (image optimization files)
     * - favicon.ico (favicon file)
     * Feel free to modify this pattern to include more paths.
    */
    "/((?!_next/static|_next/image|favicon.ico|.*\\.(?:svg|png|jpg|jpeg|gif|webp)$).*)",
  ],
};
Create Route Groups
We’ll use route groups for better organization.
app
 ├── (auth)
 └── (private)
Route groups help organize routes without affecting URLs.
Learn more about Nextjs Route Groups.
Create Auth Layout
Create:
/app/(auth)/layout.tsx
export default function AuthLayout({
  children,
}: Readonly<{
  children: React.ReactNode;
}>) {
  return (
    <div className="bg-gray-900 flex items-center justify-center flex-1">
      {children}
    </div>
  );
}
Create Login Page
Create:
/app/(auth)/login/page.tsx
"use client";

import { login } from "@/actions/auth";
import FormError from "@/components/form-error";
import Input from "@/components/input";
import LoadingButton from "@/components/loading-button";
import Image from "next/image";
import Link from "next/link";
import { useActionState } from "react";

export default function Login() {
  const [state, formAction] = useActionState(login, {
    errors: {
      email: [],
      password: [],
      formError: "",
    },
    data: {
      email: "",
      password: "",
    },
  });

  return (
    <div className="flex flex-col justify-center w-full">
      <div className="sm:mx-auto sm:w-full sm:max-w-sm">
        <Image
          src="https://tailwindcss.com/plus-assets/img/logos/mark.svg?color=indigo&shade=500"
          alt="Logo"
          className="mx-auto"
          width={50}
          height={50}
        />

        <h2 className="mt-10 text-center text-2xl/9 font-bold tracking-tight text-white">
          Sign in to your account
        </h2>
      </div>

      <div className="mt-10 sm:mx-auto sm:w-full sm:max-w-sm">
        <form action={formAction} className="space-y-6">
          <Input
            defaultValue={state?.data?.email || ""}
            name="email"
            type="email"
            label="Email address"
          />

          <FormError errors={state.errors.email} />

          <Input
            defaultValue={state?.data?.password || ""}
            name="password"
            type="password"
            label="Password"
          />

          <FormError errors={state.errors.password} />

          <LoadingButton title="Sign in" />

          <FormError errors={state?.errors?.formError} />
        </form>

        <p className="mt-10 text-center text-sm/6 text-gray-400">
          Not a member?{" "}
          <Link
            href="/register"
            className="font-semibold text-indigo-400 hover:text-indigo-300"
          >
            Register
          </Link>
        </p>
      </div>
    </div>
  );
}
Important Note About Input Names
The name attribute is extremely important because we later access form values using:
formData.get("email")
If names don’t match, your form won’t work correctly.
Create Reusable Input Component
Create:
/src/components/input.tsx
interface InputProps {
  name: string;
  label?: string;
  type?: string;
  defaultValue?: string;
  required?: boolean;
}

const Input = ({
  name,
  label,
  type = "text",
  defaultValue,
  required = true,
}: InputProps) => {
  return (
    <div>
      {label && (
        <label
          htmlFor={name}
          className="block text-sm/6 font-medium text-gray-100"
        >
          {label}
        </label>
      )}

      <div className="mt-2">
        <input
          id={name}
          type={type}
          name={name}
          defaultValue={defaultValue}
          required={required}
          autoComplete={type === "email" ? "email" : undefined}
          className="block w-full rounded-md bg-white/5 px-3 py-1.5 text-base text-white outline-1 outline-white/10"
        />
      </div>
    </div>
  );
};

export default Input;
Create Loading Button
Create:
/src/components/loading-button.tsx
"use client";

import { useFormStatus } from "react-dom";

const LoadingButton = ({
  title,
  className = "",
}: {
  title: string;
  className?: string;
}) => {
  const { pending } = useFormStatus();

  return (
    <button
      disabled={pending}
      type="submit"
      className={`cursor-pointer flex w-full justify-center rounded-md bg-indigo-500 px-3 py-1.5 text-white ${className}`}
    >
      {pending ? "Loading..." : title}
    </button>
  );
};

export default LoadingButton;
What is useFormStatus?
useFormStatus() gives information about the latest form submission state.
We use it to:
- Disable button while submitting
- Show loading state
- Prevent duplicate submissions
Create Form Error Component
Create:
/src/components/form-error.tsx
export default function FormError({
  errors,
}: {
  errors?: string | string[];
}) {
  if (!errors || (Array.isArray(errors) && errors.length === 0)) {
    return null;
  }

  return (
    <p aria-live="polite" className="text-sm text-red-500">
      {typeof errors === "string" ? errors : errors.join(", ")}
    </p>
  );
}
Install Zod
Run:
npm install zod
Create Auth Validation Schema
Create:
/src/utils/validators/auth.ts
import z from "zod";

export const authSchema = z.object({
  email: z.email(),
  password: z
    .string()
    .min(6, "Password must be at least 6 characters long")
    .max(100, "Password must not exceed 100 characters"),
});
Create Login Action
Create:
/src/actions/auth.ts
"use server";

import { redirect } from "next/navigation";
import { createClient } from "@/utils/supabase/server";
import { authSchema } from "@/utils/validators/auth";

export async function login(prev: unknown, formData: FormData) {
  const data = {
    email: formData.get("email") as string,
    password: formData.get("password") as string,
  };

  const validatedFields = authSchema.safeParse(data);

  if (!validatedFields.success) {
    return {
      data,
      errors: {
        ...validatedFields.error.flatten().fieldErrors,
        formError: "",
      },
    };
  }

  const supabase = await createClient();

  const { error } = await supabase.auth.signInWithPassword(
    validatedFields.data
  );

  if (error) {
    return {
      data,
      errors: {
        formError: error.message,
        email: [],
        password: [],
      },
    };
  }

  redirect("/");
}
Understanding the Login Action
Here’s what happens:
- Get form values using
formData - Validate using Zod
- Call Supabase Auth API
- Redirect user after successful login
Because this is a Server Action, we must use the server Supabase client.
Create Register Page
Create:
/app/(auth)/register/page.tsx
Use the same structure as login page but replace:
import { signup } from "@/actions/auth";
and:
<LoadingButton title="Sign up" />
Create Signup Action
Add this inside:
/src/actions/auth.ts
export async function signup(prev: unknown, formData: FormData) {
  const data = {
    email: formData.get("email") as string,
    password: formData.get("password") as string,
  };

  const validatedFields = authSchema.safeParse(data);

  if (!validatedFields.success) {
    return {
      data,
      errors: {
        ...validatedFields.error.flatten().fieldErrors,
        formError: "",
      },
    };
  }

  const supabase = await createClient();

  const { error } = await supabase.auth.signUp(validatedFields.data);

  if (error) {
    return {
      data,
      errors: {
        formError: error.message,
        email: [],
        password: [],
      },
    };
  }

  redirect("/");
}
Supabase may require email confirmation depending on project settings after signup.
Create Private Layout
Create:
/app/(private)/layout.tsx
import Navbar from "@/components/navbar";

export default function PrivateLayout({
  children,
}: Readonly<{
  children: React.ReactNode;
}>) {
  return (
    <>
      <Navbar />

      <div className="mt-16">{children}</div>
    </>
  );
}
Create Navbar
Create:
/src/components/navbar.tsx
import { logout } from "@/actions/auth";
import { createClient } from "@/utils/supabase/server";
import LoadingButton from "./loading-button";
import Link from "next/link";

const Navbar = async () => {
  const supabase = await createClient();

  const {
    data: { user },
  } = await supabase.auth.getUser();

  return (
    <div className="w-full flex items-center gap-4 p-4 bg-gray-800 justify-between">
      <div className="text-lg font-bold">
        Hi {user?.email}
      </div>

      <div className="flex items-center gap-4">
        <nav className="flex items-center gap-4">
          <Link href="/">Home</Link>
          <Link href="/create">Create Todo</Link>
        </nav>

        <form action={logout}>
          <LoadingButton title="Logout" />
        </form>
      </div>
    </div>
  );
};

export default Navbar;
Create Logout Action
Add this to:
/src/actions/auth.ts
export async function logout() {
  const supabase = await createClient();

  const { data: claimsData } = await supabase.auth.getClaims();

  if (claimsData?.claims) {
    await supabase.auth.signOut();
  }

  redirect("/login");
}
Protect Private Routes
Right now, users can manually access protected pages.
We need route protection.
Update:
/src/utils/supabase/proxy.ts
Replace this
await supabase.auth.getClaims()
With
const { data } = await supabase.auth.getClaims();

const user = data?.claims;
const publicRoutes = ["/login", "/register"];

if (user && publicRoutes.includes(request.nextUrl.pathname)) {
  const url = request.nextUrl.clone();
  url.pathname = "/";
  return NextResponse.redirect(url);
}

if (!user && !publicRoutes.includes(request.nextUrl.pathname)) {
  const url = request.nextUrl.clone();
  url.pathname = "/login";
  return NextResponse.redirect(url);
}
Understanding Logic
Here’s what happens:
- Get User
- Create Public Routes
- First
ifblock checks if the user is logged in & trying to access public routes then navigates user to Home - Second
ifblock checks if the user is not logged in & trying to access private routes then navigates user to Login
How Route Protection Works
Public Routes
Anyone can access:
/login/register
Private Routes
Only authenticated users can access them.
Additional Protection
Logged-in users cannot revisit auth pages.
Create Todos Table
Open:
- Supabase Project Dashboard
- From sidebar click SQL Editor
Run:
create table todos (
  id uuid primary key default gen_random_uuid(),
  user_id uuid references auth.users(id) on delete cascade not null,
  title text not null,
  completed boolean default false,
  created_at timestamptz default now()
);
Add Row Level Security Policies
Run:
create policy "Users can view own todos"
on todos
for select
using (auth.uid() = user_id);

create policy "Users can insert own todos"
on todos
for insert
with check (auth.uid() = user_id);

create policy "Users can update own todos"
on todos
for update
using (auth.uid() = user_id);

create policy "Users can delete own todos"
on todos
for delete
using (auth.uid() = user_id);
Why RLS is Important
Without RLS:
- Any user could access all data.
With RLS:
- Users can only access their own data.
This is one of the most important security features in Supabase.
Create Todo Validation Schema
Create:
/src/utils/validators/todo.ts
import z from "zod";

export const todoSchema = z.object({
  title: z
    .string()
    .min(2, "Title must be at least 2 characters long")
    .max(100, "Title must not exceed 100 characters"),
});
Create Todo Form
Create:
/app/(private)/create/page.tsx
"use client";

import { createTodo } from "@/actions/todo";
import FormError from "@/components/form-error";
import Input from "@/components/input";
import LoadingButton from "@/components/loading-button";
import { useActionState } from "react";

const CreateTodo = () => {
  const [state, formAction] = useActionState(createTodo, {
    error: "",
    data: {
      title: "",
    },
  });

  return (
    <div className="mt-10 sm:mx-auto sm:w-full sm:max-w-sm">
      <form action={formAction} className="space-y-6">
        <Input
          defaultValue={state?.data?.title || ""}
          name="title"
          label="Todo Title"
        />

        <FormError errors={state?.error} />

        <LoadingButton title="Create Todo" />
      </form>
    </div>
  );
};

export default CreateTodo;
Create Todo Action
Create:
/src/actions/todo.ts
"use server";

import { todoSchema } from "@/utils/validators/todo";
import { createClient } from "@/utils/supabase/server";
import { redirect } from "next/navigation";

export async function createTodo(
  prev: unknown,
  formData: FormData
) {
  const supabase = await createClient();

  const data = {
    title: formData.get("title") as string,
  };

  const validatedFields = todoSchema.safeParse(data);

  if (!validatedFields.success) {
    return {
      data,
      error:
        validatedFields.error.flatten().fieldErrors.title?.[0],
    };
  }

  const {
    data: { user },
  } = await supabase.auth.getUser();

  if (!user) {
    return {
      data,
      error: "Please login first",
    };
  }

  const { error } = await supabase.from("todos").insert({
    title: validatedFields.data.title,
    user_id: user.id,
  });

  if (error) {
    return {
      data,
      error: error.message,
    };
  }

  redirect("/");
}
Understanding the Create Todo Action
Here’s what happens:
- Get form values using
formData - Validate using Zod
- Get logged in user
- Call Supabase Auth API
- Redirect user after successful insert
Create Home Page
Move:
/app/page.tsx
to:
/app/(private)/page.tsx
Now update it:
import TodoActions from "@/components/todo-actions";
import { createClient } from "@/utils/supabase/server";

export default async function Home() {
  const supabase = await createClient();

  const { data } = await supabase
    .from("todos")
    .select("*")
    .order("created_at", {
      ascending: false,
    });

  return (
    <div className="overflow-x-auto rounded-2xl border border-gray-200 bg-white shadow-sm max-w-xl mx-auto">
      <table className="divide-y divide-gray-200 w-full">
        <thead className="bg-gray-50">
          <tr>
            {['Todo', 'Status', 'Actions'].map((header) => (
              <th
                key={header}
                className="px-6 py-4 text-left text-sm font-semibold text-gray-700">
                {header}
              </th>
            ))}
          </tr>
        </thead>

        <tbody className="divide-y divide-gray-100 bg-white">
          {data?.map((todo) => (
            <tr
              key={todo.id}
              className="transition-colors hover:bg-gray-50"
            >
              <td className="px-6 py-4">
                <p className="font-medium text-gray-900">
                  {todo.title}
                </p>
              </td>

              <td className="px-6 py-4">
                <span
                  className={`inline-flex rounded-full px-3 py-1 text-xs font-medium ${todo.completed
                    ? "bg-green-100 text-green-700"
                    : "bg-yellow-100 text-yellow-700"
                    }`}
                >
                  {todo.completed ? "Completed" : "Pending"}
                </span>
              </td>

              <td className="px-6 py-4">
                <TodoActions todoId={todo.id} isCompleted={todo.completed} />
              </td>
            </tr>
          ))}
        </tbody>
      </table>

      {data?.length === 0 && (
        <div className="py-10 text-center text-sm text-gray-500">
          No todos found
        </div>
      )}
    </div>
  );
}
We’re fetching todos in descending order so that the latest todo comes at top.
Create Todo Actions Component
Create:
/src/components/todo-actions.tsx
'use client';

import { handleTodoAction } from "@/actions/todo";
import { useActionState } from "react";

const TodoActions = ({ todoId, isCompleted }: { todoId: string; isCompleted: boolean; }) => {
    const [_, action, isPending] = useActionState(handleTodoAction, undefined);

    const completeTodo = () => action({ todoId, action: "complete" });
    const deleteTodo = () => action({ todoId, action: "delete" });

    return (
        <form className="flex justify-end gap-3">
            {!isCompleted &&
                <button
                    formAction={completeTodo}
                    disabled={isPending}
                    className="rounded-lg disabled:opacity-50 bg-blue-500 px-4 py-2 text-sm font-medium text-white transition hover:bg-blue-600"
                >
                    Complete
                </button>
            }
            <button
                formAction={deleteTodo}
                disabled={isPending}
                className="rounded-lg disabled:opacity-50 bg-red-500 px-4 py-2 text-sm font-medium text-white transition hover:bg-red-600"
            >
                Delete
            </button>
        </form>
    )
}

export default TodoActions
Complete and Delete Todo Action
Add inside:
/src/actions/todo.ts
import { revalidatePath } from "next/cache";

export async function handleTodoAction(prev: unknown, data: { todoId: string; action: "delete" | "complete" }) {

    const { todoId, action } = data;

    if (!todoId) return;

    const supabase = await createClient()
    const { data: { user } } = await supabase.auth.getUser();

    if (!user) return;

    if (action === 'delete') {
        await supabase
            .from("todos")
            .delete()
            .eq("id", todoId)
            .eq("user_id", user.id);
    } else {
        await supabase
            .from("todos")
            .update({
                completed: true,
            })
            .eq("id", todoId)
            .eq("user_id", user.id);
    }
    revalidatePath('/');
}
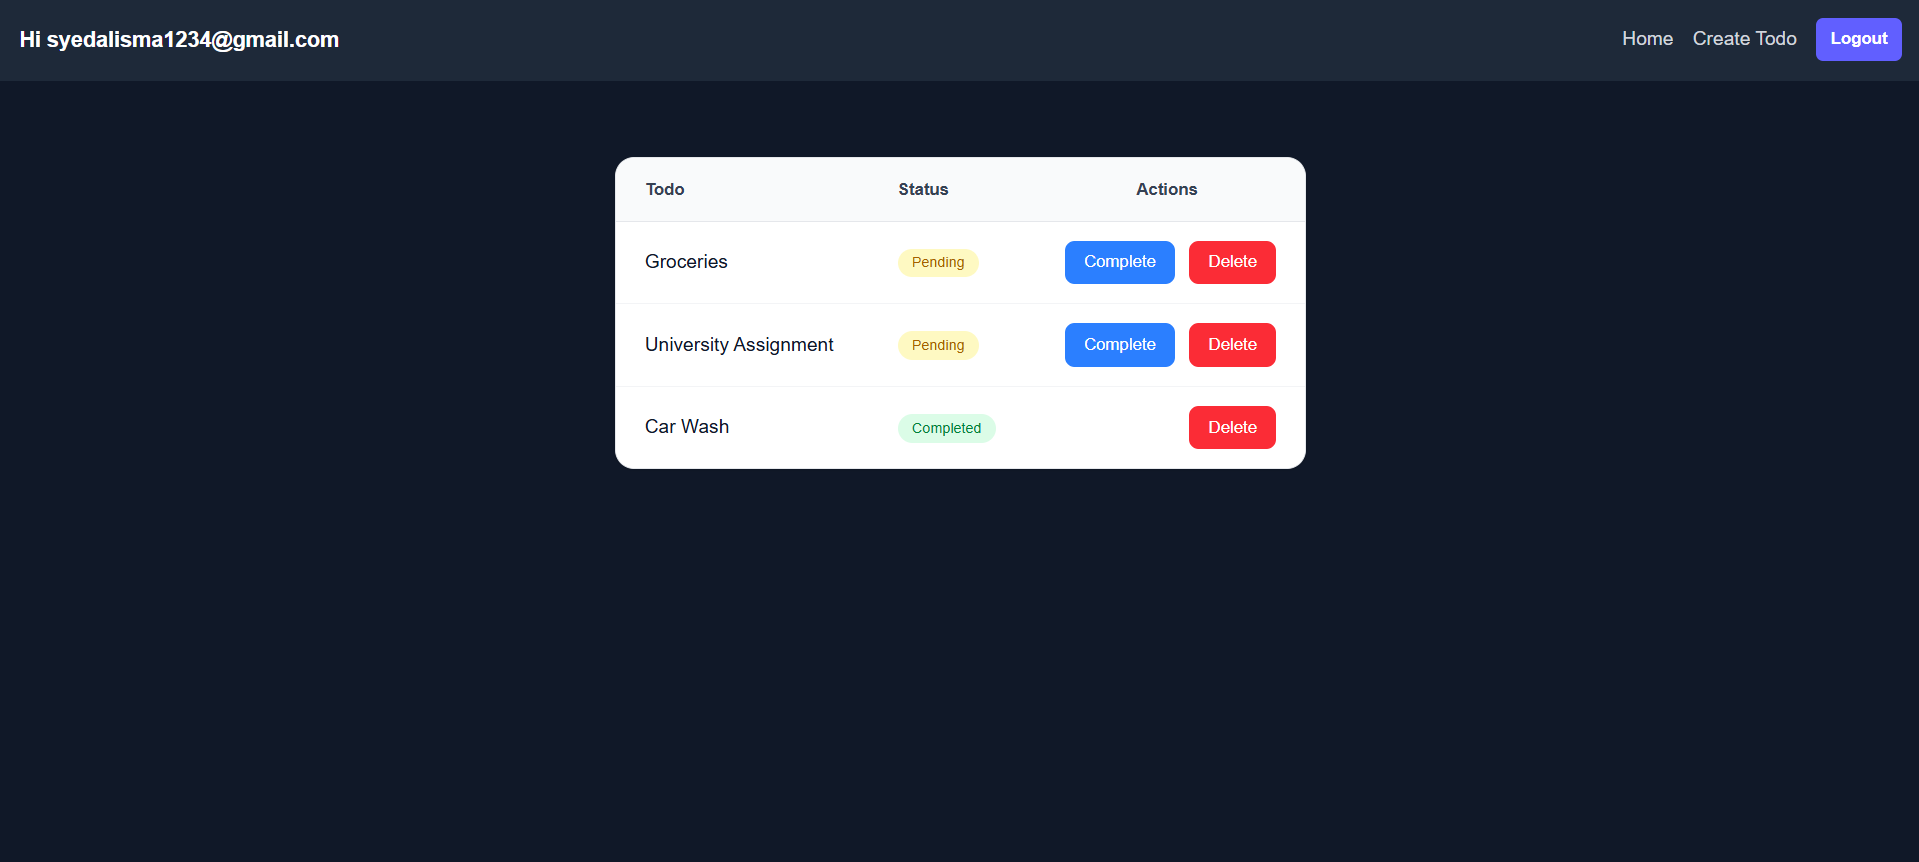
Final Result
You now have a fully functional Todo App with:
- Next.js 16
- Supabase Authentication
- Protected Routes
- Server Actions
- Zod Validation
- Secure RLS Policies
- CRUD Operations
Conclusion
This project demonstrates a modern full-stack architecture using:
- Next.js 16
- Server Actions
- Supabase
- RLS
- Authentication
Even though it’s a simple Todo App, the structure is production-ready and scalable.
You can now build larger applications using the same architecture and patterns.
Useful Resources
Source Code: https://github.com/Muhammad-Ali-sma/Todo-App