Google Search Console Setup for Next.js (2026 Beginner's Guide)
You just shipped your Next.js site. Metadata's wired up, Open Graph tags look great, JSON-LD is in place — and yet Google has no idea your site exists. Weeks go by, you check your analytics, and organic traffic is basically zero.
Here's the thing nobody tells beginners: writing good SEO code isn't the same as telling Google to actually crawl it. That connection happens through one tool — Google Search Console (GSC) — and it's one of the most important tools new Next.js developers should set up after launch.
By the end of this guide, you'll have Google Search Console fully connected to your Next.js 16 App Router site, a submitted sitemap, a correctly configured robots.txt, and a repeatable process for catching indexing problems before they cost you traffic.
Why This Is Tricky
Google Search Console isn't part of your codebase, so it's easy to treat it as an afterthought — something you'll "get to later." But GSC is the only place that tells you:
- Whether Google can actually crawl your pages
- Which pages are indexed (showing up in search) versus silently ignored
- Real search queries people used to land on your site
- Core Web Vitals issues that can contribute to a poor page experience and potentially affect search performance
Without it, you're optimizing blind. You could have a metadata bug shipping noindex to your entire site for a week and never know until traffic craters.
Prerequisites
This guide assumes:
- Next.js 16 with the App Router
- TypeScript in strict mode
- A site already deployed to a live domain (Vercel, Netlify, or self-hosted — the Next.js side works the same everywhere)
- Access to your domain's DNS settings (through your registrar or host)
If your project doesn't have app/sitemap.ts or app/robots.ts yet, don't worry — we'll build both from scratch.
Step 1: Create the Google Search Console Property
Head to search.google.com/search-console and sign in with the Google account you want to permanently own this property. If you're doing this for a client, use an account you control and add them as a verified owner afterward — don't set the property up under their personal Gmail unless you're handing off the project entirely.
You'll be asked to choose a property type:
| Property type | Covers | Verification |
|---|---|---|
| Domain property | All subdomains and both http/https versions under one property | DNS only |
| URL-prefix property | Just the exact URL pattern you enter | DNS, HTML file, meta tag, GA, or GTM |
💡 Tip: For a new site, go with a Domain property. It's the most complete option — you get
wwwand non-www,httpandhttps, and every subdomain in a single dashboard instead of juggling separate properties for each variant.
The tradeoff is that Domain properties only support DNS verification, which means you need access to your domain's DNS zone (through your registrar, or through Vercel's domain settings if Vercel manages your DNS).
Step 2: Verify Ownership
Option A — DNS TXT Record (Recommended for Domain Properties)
This is the most reliable method because it's tied to the domain itself, not a specific file or page — it survives redeploys, framework migrations, and hosting changes.
- GSC gives you a TXT record value that looks like
google-site-verification=abc123... - Log into your DNS provider (Cloudflare, Namecheap, GoDaddy, or your registrar)
- Add a new TXT record:
- Host/Name:
@(represents your root domain) - Value: the code GSC gave you
- TTL: default (usually 3600)
- Host/Name:
- Save, go back to GSC, and click Verify
⚠️ Common Mistake: DNS changes aren't instant. Some providers (Cloudflare especially) propagate in 2–3 minutes, but others can take up to an hour. If verification fails immediately, wait and retry rather than assuming you did something wrong.
Option B — HTML Meta Tag (URL-Prefix Properties)
If you went with a URL-prefix property instead, GSC gives you a meta tag like:
<meta name="google-site-verification" content="your-code-here" />
In Next.js's App Router, don't paste this directly into a <head> tag — the Metadata API has a dedicated field for it:
// app/layout.tsx
import type { Metadata } from "next";

export const metadata: Metadata = {
  // ...your existing metadata
  verification: {
    google: "your-code-here",
  },
};
What's happening here: Next.js's Metadata API generates the correct <meta name="google-site-verification"> tag for you, merged in with the rest of your root layout's metadata. This is safer than hand-editing HTML because it can't accidentally get wiped out by a template change.
⚠️ Common Mistake: Only setting the
verificationfield in a nested page's metadata instead of the rootapp/layout.tsx. Google checks your homepage for this tag, so it has to live in metadata that actually applies to/.
Redeploy, then click Verify in GSC.
Step 3: Generate a Sitemap with sitemap.ts
A sitemap is a map of every URL you want indexed. It doesn't force Google to index anything, but it can make URL discovery more efficient — especially for new sites, large sites, or pages with few internal links.
Next.js has a built-in file convention for this — no packages needed:
// app/sitemap.ts
import { MetadataRoute } from "next";
import { getAllPosts } from "@/lib/posts";
import { appURL } from "@/lib/utils";

export default function sitemap(): MetadataRoute.Sitemap {
  const posts = getAllPosts().map((post) => ({
    url: `${appURL}/blog/${post.slug}`,
    lastModified: new Date(post.updatedAt || post.publishedAt),
  }));

  const staticRoutes = ["", "/about", "/blog", "/contact"].map((route) => ({
    url: `${appURL}${route}`,
  }));

  return [...staticRoutes, ...posts];
}
What's happening here: dropping a file named sitemap.ts inside app/ tells Next.js to automatically generate a working route at /sitemap.xml — you never manually build or serve XML. lastModified tells search engines when a page was last meaningfully updated. Google can use an accurate lastmod value when deciding when to recrawl a URL. Although Next.js supports changeFrequency and priority, Google says it ignores those two sitemap values, so don't treat them as ranking or crawling controls.
💡 Tip: Only include canonical URLs that you actually want search engines to discover and potentially index. Don't add
/admin,/api/*, private pages, draft URLs, or other non-indexable routes to your sitemap.
Step 4: Configure robots.ts Correctly
robots.txt tells crawlers which URLs they can or can't request. It controls crawling — not whether a page can appear in search results.
// app/robots.ts
import { MetadataRoute } from "next";
import { appURL } from "@/lib/utils";

export default function robots(): MetadataRoute.Robots {
  return {
    rules: {
      userAgent: "*",
      allow: "/",
      disallow: ["/admin", "/api"],
    },
    sitemap: `${appURL}/sitemap.xml`,
  };
}
What's happening here: same pattern as the sitemap — Next.js auto-generates a working /robots.txt from this file. allow: "/" lets crawlers visit everything by default, disallow blocks specific internal paths, and pointing sitemap at your sitemap URL here means crawlers can discover it even before you manually submit it in GSC.
⚠️ Common Mistake: Leaving
disallow: "/"inrobots.tsafter moving from a staging environment to production. This single line blocks your entire site from every search engine. Always double-check this file immediately after your first production deploy.
Tip If you need to prevent a page from being indexed, use noindex rather than relying on robots.txt.
Step 5: Submit Your Sitemap in GSC
Once you're verified:
- In the GSC sidebar, click Sitemaps
- Enter
sitemap.xml(GSC prepends your domain automatically) - Click Submit
You should see a "Success" status within a few minutes, though it can take a day or two before "Discovered URLs" starts populating.
💡 Tip: If your sitemap shows "Couldn't fetch," visit
yourdomain.com/sitemap.xmldirectly in your browser first. If it 404s, the issue is your deployment, not GSC — check thatapp/sitemap.tsactually made it into your production build.
Step 6: Verify Robots Meta Tags Aren't Blocking Individual Pages
robots.txt controls crawling at the site level, but an individual page can still say "don't index me" through page-level metadata — easy to forget on a page you copy-pasted from a draft.
// app/some-page/page.tsx
import type { Metadata } from "next";

export const metadata: Metadata = {
  robots: {
    index: false,
    follow: false,
  },
};
⚠️ Common Mistake: Setting
index: falseon the root layout "just to be safe" during development, then forgetting to flip it before launch. This is one of the most common reasons a brand-new Next.js site gets zero organic traffic for weeks — always check your homepage's rendered<meta name="robots">tag in production before assuming GSC is the problem.
You normally don't need to explicitly set index: true and follow: true. The important thing is making sure you haven't accidentally configured these false on pages you want in search.
You can check this instantly using GSC's URL Inspection Tool (covered next) — it tells you directly whether Google sees a page as indexable.
Step 7: Use URL Inspection to Force Indexing
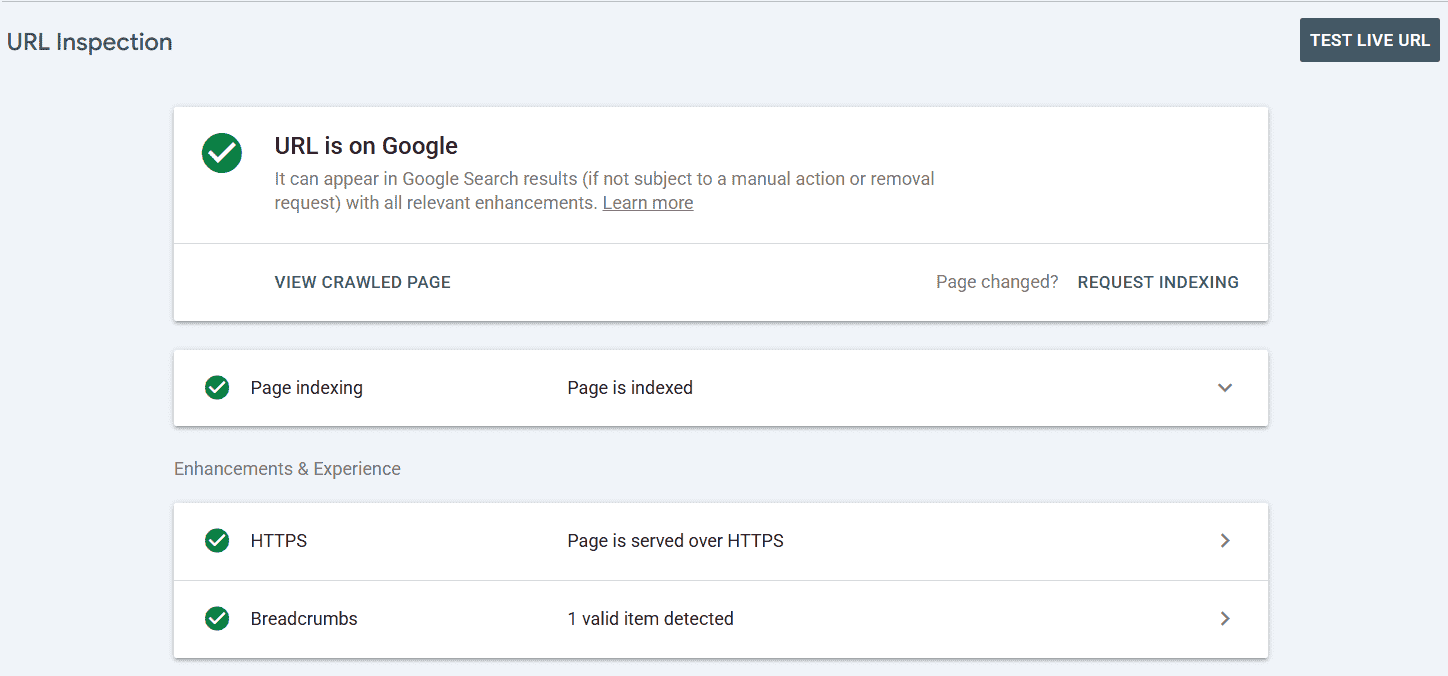
The URL Inspection Tool is the single most useful feature in GSC day-to-day. Paste any URL from your site into the search bar at the top of GSC, and it tells you:
- Whether the page is currently indexed
- When it was last crawled
- Whether anything (robots meta, canonical mismatch,
noindex) is blocking it
After publishing a new page or fixing a metadata bug, you can use Request Indexing to ask Google to recrawl the URL. It doesn't guarantee immediate crawling or indexing, so use your sitemap for ongoing URL discovery rather than repeatedly requesting individual URLs.
💡 Tip: Request Indexing has a daily quota per property. Don't use it for bulk resubmission of your whole site — that's what your sitemap is for. Reserve it for genuinely new or recently fixed pages.
Step 8: Check Core Web Vitals
GSC's Core Web Vitals report shows real-user field data (from actual Chrome visitors), not just a local Lighthouse score. This matters because Core Web Vitals are used by Google's ranking systems, and lab data can look great locally while real users on slower connections or devices have a worse experience.
Watch for pages slipping from "Good" into "Needs improvement" or "Poor" — this is usually caused by:
- Unoptimized images (missing
next/image, or missingwidth/height) - Large third-party scripts loaded without
next/scriptstrategy - Web fonts causing layout shift instead of using
next/font
The report uses real-user data rather than a synthetic Lighthouse test, so your local performance score and your users' actual experience can tell different stories.
Related: Image Optimization in Next.js 16 covers the next/image configuration options that most directly affect this report.
Step 9: Check Your Canonical URLs
Google doesn't only decide whether a page can be indexed — it also chooses which URL represents duplicate or very similar versions of the same content.
In Next.js, make sure important pages have the correct canonical URL, especially if your site supports multiple URL variations.
import type { Metadata } from "next";

export const metadata: Metadata = {
  alternates: {
    canonical: "https://example.com/blog/my-post",
  },
};
⚠️ A canonical URL is a hint, not a guarantee. Google can choose a different canonical if it determines another URL is a better representative of the content.
Step 10: Understanding "Discovered — Currently Not Indexed"
Sooner or later you'll open the Page indexing report and see a bucket of URLs labeled Discovered — currently not indexed. This is one of the most common statuses beginners panic over, so it's worth understanding what it actually means.
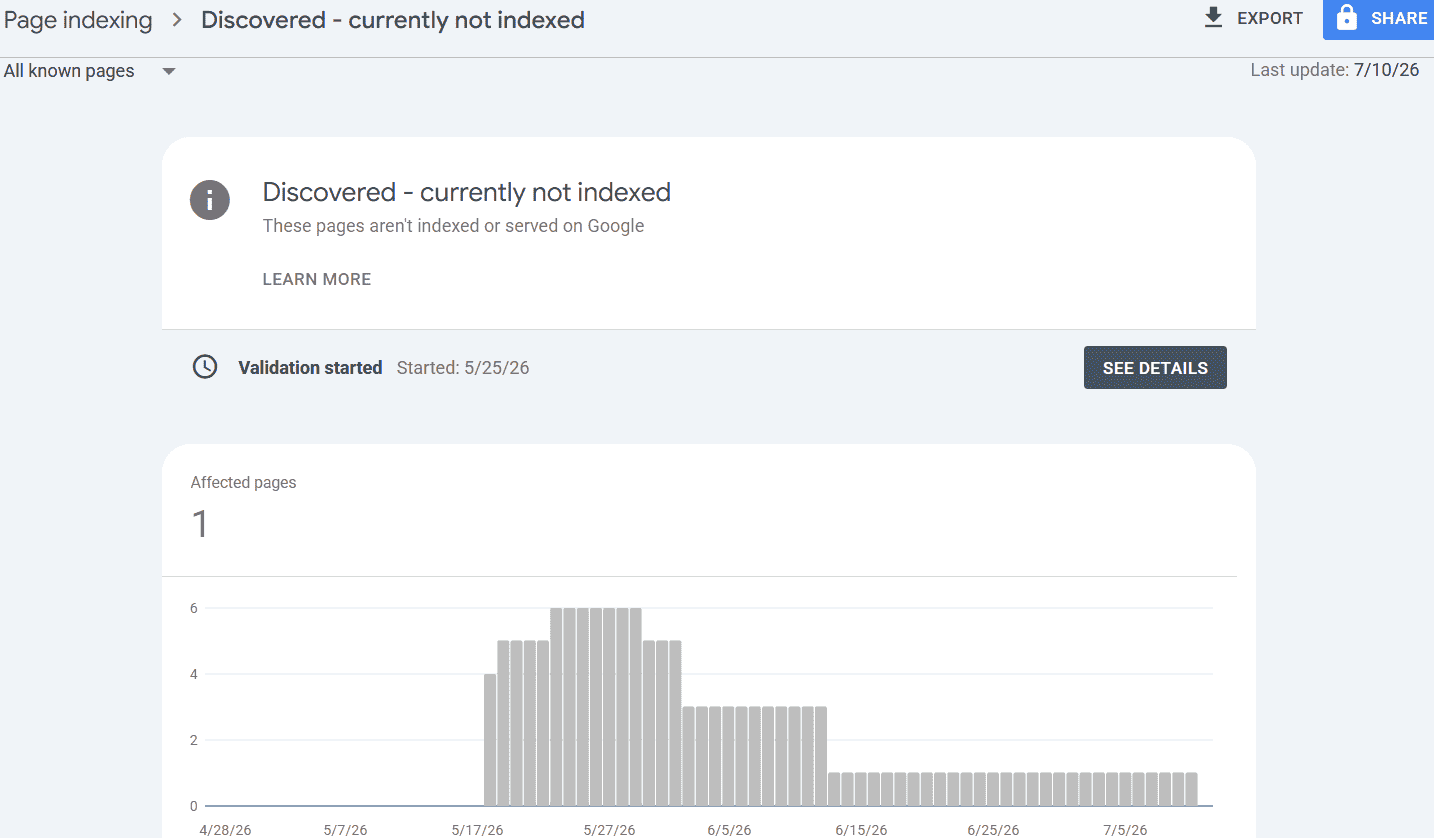
It means Google found the URL — usually through your sitemap or an internal link — but hasn't crawled and indexed it yet. This is different from Crawled — currently not indexed, where Google did visit the page but chose not to index it. Both statuses are common and don't always signal a problem; a brand-new site with dozens of freshly submitted URLs will often show a pile of "Discovered" pages that clear up on their own within a couple of weeks.
That said, if a URL sits in this state for more than two to three weeks, it's worth investigating:
- Thin or low-value content — tag pages, barely-filled pages, or near-duplicates may provide little unique value. Make sure important URLs contain useful, distinct content.
- Crawl budget — very large sites, or sites publishing a lot of near-identical pages quickly, can outpace how much Google is willing to crawl in a given period.
- Weak internal linking — a page with no other pages linking to it signals lower importance. Link to new posts from your homepage, a category page, or related content shortly after publishing.
- Server response issues — if Googlebot hit a slow response or a temporary error when it tried to crawl, it may deprioritize a retry rather than fail loudly.
💡 Tip: Don't spam Request Indexing on the same "Discovered" URL every day — it doesn't speed anything up and doesn't change why Google deprioritized the crawl in the first place. Fix the underlying content or linking issue, then request indexing once.
Step 11: Don't Forget Bing Webmaster Tools
Google isn't the only crawler worth your time. Bing powers Microsoft's search ecosystem and is also an important source of web search visibility beyond Google — real, easy traffic most developers skip entirely.
- Sign up at Bing Webmaster Tools
- Submit the exact same
sitemap.xmlyou already built — no separate file needed - Bing lets you import your verified site directly from Google Search Console in a couple of clicks, skipping manual re-verification entirely
A Simple Weekly Routine
Set aside 10–15 minutes a week and check:
- Performance report — any unusual drops or spikes in clicks/impressions?
- Page indexing report — any pages stuck in "Discovered — currently not indexed" for more than two weeks?
- Core Web Vitals — any pages that moved from Good to Needs Improvement?
Catching a regression here in week one is a five-minute fix. Catching it three months later, after it's quietly tanked your rankings, is a much longer recovery.
Troubleshooting Checklist
If something isn't working, work through these in order before assuming it's a GSC bug:
- Verification failing? Wait at least 30–60 minutes after adding a DNS TXT record before retrying — propagation isn't instant.
- Verification meta tag "not found"? View your production page source (not localhost) and confirm the
google-site-verificationtag is actually in the rendered<head>— check it's set inapp/layout.tsx, not a nested page. - Sitemap "Couldn't fetch"? Visit
yourdomain.com/sitemap.xmldirectly in a browser first. A 404 means a deployment problem, not a GSC problem. - Sitemap fetches but pages aren't indexed? Check
robots.tsisn't disallowing the path, and check the page's own metadata isn't settingrobots: { index: false }. - Whole site missing from search? Check
app/robots.tsfor an accidentaldisallow: "/"— this is the single most common self-inflicted outage. - Pages stuck on "Discovered — currently not indexed"? Give it 2–3 weeks first. If it persists, check for thin content and add internal links pointing to the page.
- Core Web Vitals showing "Poor"? Confirm images use
next/image, fonts usenext/font, and large third-party scripts usenext/scriptwith an appropriate loading strategy. - Data missing entirely after adding the property? This can be normal for a new property. Google says data collection begins when the property is added, even before verification, but it can take up to a week for data to appear.
Frequently Asked Questions
Do I need a Domain property or URL-prefix property for Next.js?
Domain property, in almost every case — it covers www, non-www, and both protocols under one dashboard. Only use URL-prefix if you specifically need isolated data for a subdomain or can't get DNS access.
How long until I see data in Google Search Console?
Search Console doesn't give you historical performance data from before Google started collecting data for the property. Google says data collection can begin when the property is added, even before ownership verification is completed. In practice, expect the reports to take some time to populate, and don't panic if impressions stay low for the first couple of weeks on a brand-new site.
My sitemap shows "Couldn't fetch." What's wrong?
Almost always a deployment issue, not a GSC issue. Visit yourdomain.com/sitemap.xml directly — if it 404s or shows an error, check that app/sitemap.ts is actually included in your production build and isn't being blocked by robots.ts.
Can I use both a DNS TXT record and a meta tag verification?
Yes. You can maintain multiple verification methods. This can be useful as a backup, although you don't need multiple methods for normal operation. Domain properties use DNS verification, while URL-prefix properties support additional methods such as HTML meta tags.
Does adding a sitemap guarantee my pages get indexed?
No. A sitemap only helps Google discover URLs faster — it doesn't override noindex tags, thin-content penalties, or crawl budget limits. Pages still need to pass Google's own quality bar to actually rank.
Wrapping Up
Google Search Console setup for Next.js comes down to five things that take about 20 minutes total: verify ownership, ship app/sitemap.ts, ship a correctly scoped app/robots.ts, submit the sitemap, and build a weekly habit of checking the Performance and Page Indexing reports. None of it is complicated — it's just easy to skip, and skipping it is exactly why so many well-built Next.js sites sit invisible in search for months after launch.
From here, a natural next step is pairing this with a proper JSON-LD structured data setup so your indexed pages are eligible for rich results, not just a plain blue link.
Continue Learning
- Google Tag Manager & GA4 Setup for Next.js 16
- llms.txt Explained: Should Your Next.js Site Have One in 2026?
- The Complete Technical SEO Checklist for Next.js Developers (2026 Guide)
- How to Add Metadata in Next.js 16 (2026 Beginner's Guide)
- Next.js Rendering Strategies Explained: SSR, SSG, CSR, ISR & Cache Components (2026)
Free SEO Tools
- JSON-LD Generator for Next.js & HTML - generate Article, FAQ, Product, LocalBusiness, SoftwareApplication, Breadcrumb, Person, Organization, and Website JSON-LD — checked live against Google's actual Rich Results requirements.
- Meta Tag Generator for Next.js & HTML — generate SEO meta tags, Open Graph tags, Twitter Cards, and canonical URLs instantly. Handy for wiring up per-post metadata like the
generateMetadata()function above. - Supabase RLS Policy Generator — if your next project pairs this blog setup with a Supabase backend, generate secure, performance-optimized Row Level Security policies in seconds.
- Zod Schema Generator — generate Zod schemas instantly from JSON or TypeScript. Includes smart inference, live validation, React Hook Form, Next.js API Routes, and Server Actions.

 Reddit
 WhatsApp
More in SEO
View AllNext.js Adoption Benchmark 2026: The Data
An original 2026 Next.js adoption benchmark built from public npm, GitHub, and developer survey data — covering downloads, App Router use, and sentiment.
llms.txt Explained: What It Is, Who Uses It, and How to Add It to Next.js
llms.txt explained for Next.js developers — what it actually is, who really reads it, and a copy-paste guide to adding one to your App Router site in 2026.
Google Tag Manager & GA4 Setup for Next.js 16 (2026 Guide)
Learn how to set up Google Tag Manager and GA4 in Next.js 16 App Router — GTM container, GA4 property, custom events, and Consent Mode, step by step.
The Complete Technical SEO Checklist for Next.js Developers (2026 Guide)
A beginner-friendly, step-by-step technical SEO checklist for Next.js apps — crawlability, metadata, structured data, Core Web Vitals, and more.