Route Handlers Explained in Next.js 16
You've built pages, you've built layouts, and now you need something that isn't a page at all — a webhook endpoint for Stripe, a JSON API for a mobile app, or a route that generates a CSV file on demand. None of that fits inside a page.tsx. That's exactly the gap Route Handlers fill in the Next.js App Router.
If you've used the old Pages Router, Route Handlers are the direct replacement for pages/api. If you're coming from Express or another Node framework, think of them as your app.get() and app.post() — just organized by folder structure instead of a router file.
By the end of this guide, you'll know exactly how Route Handlers work in Next.js 16, how they're different from Server Actions, how caching behaves with the new Cache Components model, and how to build a real, typed API endpoint — including handling dynamic routes and webhooks.
Here's the whole picture at a glance before we dive in step by step:
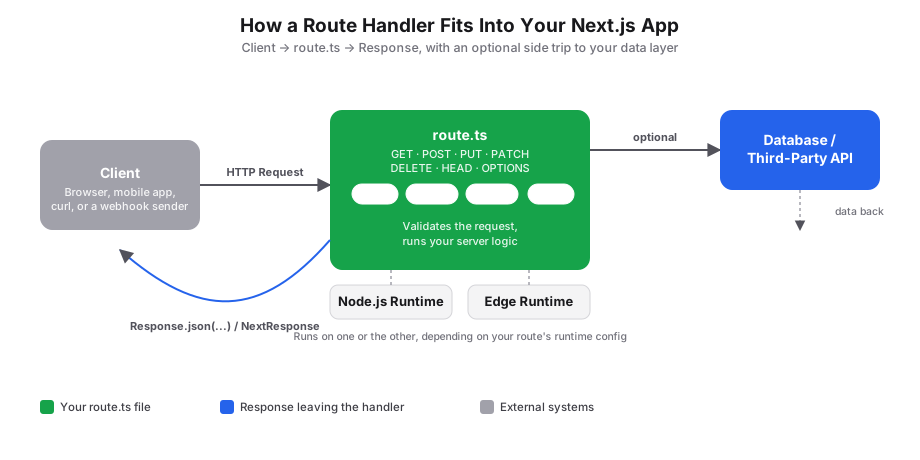
What Are Route Handlers, Exactly?
A Route Handler is a function that runs on the server and responds to an HTTP request — no HTML, no React, just data. You define one inside a special file named route.ts, and it can live anywhere inside your app directory.
// app/api/hello/route.ts
export async function GET() {
  return Response.json({ message: "Hello from Next.js 16!" })
}
Visit /api/hello in your browser, and you'll get back that JSON — no page rendered, just a raw HTTP response.
💡 Tip: Route Handlers use the standard Web
RequestandResponseAPIs — the same ones built into browsers and modern JavaScript runtimes — not the old Express-stylereq/resobjects. That means the skills you learn here also apply outside Next.js.
Why This Is Tricky (For Beginners)
New Next.js developers usually hit two points of confusion:
- "Isn't this just an API Route?" — Sort of, but Route Handlers live in
app/and use a completely different file convention (route.tsinstead of pulling frompages/api). - "Should I use a Route Handler or a Server Action?" — Both let you run server-side code, but they solve different problems, and picking the wrong one leads to unnecessary complexity later.
Let's clear both of those up before touching any code.
Route Handlers vs. Pages Router API Routes
If you're migrating from the Pages Router, pages/api/hello.ts becomes app/api/hello/route.ts. The concept is identical — a folder-based endpoint — but the syntax changes from a single default export to named exports per HTTP method.
Good to know: You never need to mix API Routes and Route Handlers in the same project. If your project uses the
appdirectory, Route Handlers are your only option for API-style endpoints — the Pages Router pattern doesn't apply anymore.
Route Handlers vs. Server Actions
This is the question that trips up almost everyone, so here's the short version:
| Route Handlers | Server Actions | |
|---|---|---|
| Called from | Anywhere (browser, mobile app, another server, curl) | Only from inside your own React components |
| Best for | Public APIs, webhooks, third-party integrations | Form submissions, internal data mutations |
| HTTP control | Full — you choose methods, headers, status codes | Handled for you automatically |
| URL | Has a real, callable URL | No public URL of its own |
Rule of thumb: if something outside your Next.js app (a webhook from Stripe, a mobile client, a public API consumer) needs to call this code, use a Route Handler. If it's a form or button inside your own app calling a server function, a Server Action is simpler and does less boilerplate for you.
Related: Next.js Rendering Strategies Explained: SSR, SSG, CSR, ISR & Cache Components
Prerequisites
This guide uses:
- Next.js 16 with the App Router
- TypeScript in strict mode
- React Compiler enabled (not directly relevant to Route Handlers, but assumed as the project default)
You don't need any extra packages — everything here ships with Next.js out of the box.
Step 1: The route.ts File Convention
A Route Handler is created by adding a route.ts (or route.js) file inside any folder in app/. The folder path becomes the URL.
app/
└── api/
    └── hello/
        └── route.ts       → /api/hello
// app/api/hello/route.ts
export async function GET(request: Request) {
  return Response.json({ message: "Hello, world!" })
}
What's happening here: exporting a function named GET tells Next.js "handle GET requests to this route with this function." The function receives the standard Web Request object and must return a Response (or NextResponse, which extends it).
⚠️ Common Mistake: A
route.tsfile cannot live in the same folder as apage.tsxat the same segment.app/page.tsxandapp/route.tstogether will throw a build error — Next.js doesn't know whether that URL should render a page or run an API handler. Nest your Route Handler under a different segment, likeapp/api/..., instead.
Step 2: Supported HTTP Methods
Route Handlers support the standard HTTP verbs as named exports in the same file: GET, POST, PUT, PATCH, DELETE, HEAD, and OPTIONS.
// app/api/todos/route.ts
export async function GET() {
  const todos = await getTodosFromDb()
  return Response.json(todos)
}

export async function POST(request: Request) {
  const body = await request.json()
  const newTodo = await createTodo(body)
  return Response.json(newTodo, { status: 201 })
}
What's happening here: one file now handles two different behaviors depending on the incoming HTTP method — a GET request lists todos, a POST request creates one. If a client sends a method you haven't exported (like DELETE on a file with only GET/POST), Next.js automatically responds with a 405 Method Not Allowed — you don't need to handle that yourself.
💡 Tip: Next.js also auto-implements a sensible
OPTIONSresponse for you if you don't define one, which is useful for CORS preflight requests (more on that below).
Response vs. NextResponse, Request vs. NextRequest
Before going further, it's worth clearing up which object to reach for — they show up interchangeably in examples online, which confuses a lot of beginners.
Request/Response— the plain Web APIs, built into the JavaScript runtime itself, not Next.js-specific. Use these when you don't need anything extra — a simple JSON response, or reading a body withrequest.json().NextRequest(fromnext/server) — extendsRequestwith Next.js-only conveniences, most notablyrequest.nextUrl(an already-parsed URL object) andrequest.cookies. Reach for this the moment you need query params or cookies without manually parsing the URL string.NextResponse(fromnext/server) — extendsResponsewith helpers likeNextResponse.redirect(),NextResponse.rewrite(), and easier cookie-setting viaresponse.cookies.set(). Use this when you need to redirect, rewrite, or set cookies on the way out.
💡 Tip: A good default: start with plain
Request/Response.json()for simple handlers, and upgrade toNextRequest/NextResponseonly when you actually need one of their extra features. Both pairs are fully interoperable — a function typed to acceptNextRequeststill works fine if you never end up using the extra methods.
Step 3: Reading Data From the Request
Most real endpoints need to read something — a JSON body, a query parameter, or a header.
// app/api/search/route.ts
import { NextRequest } from "next/server"

export async function GET(request: NextRequest) {
  // Reading a query param: /api/search?q=nextjs
  const query = request.nextUrl.searchParams.get("q")

  if (!query) {
    return Response.json({ error: "Missing 'q' parameter" }, { status: 400 })
  }

  const results = await searchDatabase(query)
  return Response.json(results)
}
What's happening here: NextRequest (imported from next/server) extends the standard Request with convenience helpers — request.nextUrl gives you an already-parsed URL object, so searchParams.get("q") is easier than manually parsing request.url with the native URL class.
For a JSON body on a POST or PUT request, use request.json():
// app/api/contact/route.ts
export async function POST(request: Request) {
  const { email, message } = await request.json()

  if (!email || !message) {
    return Response.json(
      { error: "Email and message are required" },
      { status: 400 }
    )
  }

  await sendContactEmail({ email, message })
  return Response.json({ success: true })
}
⚠️ Common Mistake: Never trust that
messageexist just because your frontend form requires them. Anyone can send a rawPOSTrequest straight to/api/contactwithcurl, skipping your form entirely — always validate on the server, ideally with a schema library like Zod.
Step 4: Dynamic Route Segments
Just like pages, Route Handlers support dynamic segments using square brackets.
app/
└── users/
    └── [id]/
        └── route.ts        → /users/123, /users/456, etc.
In Next.js 16, the recommended way to type the dynamic segment is the built-in RouteContext helper — it's generated automatically for you based on your actual route structure.
// app/users/[id]/route.ts
import type { NextRequest } from "next/server"

export async function GET(
  request: NextRequest,
  ctx: RouteContext<"/users/[id]">
) {
  const { id } = await ctx.params
  const user = await getUserById(id)

  if (!user) {
    return Response.json({ error: "User not found" }, { status: 404 })
  }

  return Response.json(user)
}
What's happening here: ctx.params is a Promise — this matches the same async params convention used in page.tsx files throughout Next.js 16, so you must await it before reading id. RouteContext<"/users/[id]"> gives you full type-safety without manually writing an interface for every dynamic route.
Good to know: These types are generated when you run
next dev,next build, ornext typegen— if your editor shows a type error right after creating a new dynamic route, running one of those commands usually fixes it.
Step 5: Caching Behavior
This trips up a lot of people coming from the Pages Router, where API Routes were never cached. In the App Router, it's a little more nuanced.
The short version: Route Handlers are not cached by default. Only GET handlers can opt into caching — every other method (POST, PUT, DELETE, etc.) is always dynamic, even if you configure caching in the same file.
To force a GET handler to be cached as static:
// app/items/route.ts
export const dynamic = "force-static"

export async function GET() {
  const res = await fetch("https://data.example.com/items")
  const data = await res.json()
  return Response.json({ data })
}
If You're Using Cache Components ("use cache")
If your project has Cache Components enabled, GET Route Handlers behave exactly like a normal page: they run dynamically by default, but can be pre-rendered at build time if they don't touch anything request-specific.
// app/api/project-info/route.ts
// No dynamic data — this gets pre-rendered at build time
export async function GET() {
  return Response.json({ projectName: "DevStacked" })
}
// app/api/user-agent/route.ts
import { headers } from "next/headers"

// Reads a request-specific header — this forces the route to run per-request
export async function GET() {
  const headersList = await headers()
  const userAgent = headersList.get("user-agent")
  return Response.json({ userAgent })
}
If you need to mix cached data with per-request logic, pull the cached part into its own function using "use cache" — you can't put "use cache" directly inside the Route Handler body itself.
// app/api/products/route.ts
import { cacheLife } from "next/cache"

export async function GET() {
  const products = await getProducts()
  return Response.json(products)
}

async function getProducts() {
  "use cache"
  cacheLife("hours")

  return await db.query("SELECT * FROM products")
}
💡 Tip: Prerendering for a
GEThandler stops the moment it touches anything non-deterministic — a database call without"use cache",Math.random(), or runtime APIs likecookies()andheaders(). If a route you expected to be static is showing up dynamic in your build output, one of these is almost always why.
A Quick Word on the Edge Runtime
By default, Route Handlers run on the Node.js runtime — the full Node environment, with access to everything you'd expect (the fs module, native npm packages, longer execution limits). You can opt a specific route into the lighter-weight Edge Runtime instead:
// app/api/geo/route.ts
export const runtime = "edge"

export async function GET() {
  return Response.json({ message: "Running on the Edge" })
}
The Edge Runtime starts faster and runs closer to the user geographically, but it's a stripped-down environment — no fs, no full Node API surface, and not every npm package supports it. Reach for it for small, latency-sensitive handlers (geolocation checks, lightweight redirects); stick with the Node.js default for anything doing real database work, file access, or using Node-only packages like the Stripe or AWS SDKs.
Step 6: Handling Webhooks (Raw Body Access)
Webhooks — like Stripe payment confirmations — are one of the most common real-world uses for Route Handlers. The key detail: webhook signature verification needs the raw, unparsed request body, not JSON.
// app/api/webhook/route.ts
import { NextResponse } from "next/server"
import { headers } from "next/headers"
import Stripe from "stripe"
import { stripe } from "@/lib/stripe"

const endpointSecret = process.env.STRIPE_WEBHOOK_SECRET!

export async function POST(req: Request) {
  const payload = await req.text() // raw text, NOT req.json()
  const signature = (await headers()).get("stripe-signature")

  if (!signature) {
    return NextResponse.json({ error: "Missing signature" }, { status: 400 })
  }

  let event: Stripe.Event

  try {
    event = stripe.webhooks.constructEvent(payload, signature, endpointSecret)
  } catch (err) {
    const message = err instanceof Error ? err.message : "Unknown error"
    return NextResponse.json({ error: `Webhook Error: ${message}` }, { status: 400 })
  }

  // event is now verified — safe to trust
  return NextResponse.json({ received: true })
}
What's happening here: req.text() reads the body exactly as Stripe sent it. If you call req.json() first, the body gets re-serialized slightly differently, and the cryptographic signature check fails — a classic gotcha that has nothing to do with your actual secret key.
Related: Stripe Payment Element in Production: Webhooks, Idempotency & Testing
Step 7: Adding CORS Support
If your Route Handler needs to be called from a different domain (a separate frontend, a browser extension, another app), you need to explicitly allow it with CORS headers.
// app/api/public-data/route.ts
export async function GET() {
  return Response.json(
    { data: "available to any origin" },
    {
      headers: {
        "Access-Control-Allow-Origin": "*",
      },
    }
  )
}

export async function OPTIONS() {
  return new Response(null, {
    status: 204,
    headers: {
      "Access-Control-Allow-Origin": "*",
      "Access-Control-Allow-Methods": "GET, POST, OPTIONS",
      "Access-Control-Allow-Headers": "Content-Type, Authorization",
    },
  })
}
⚠️ Common Mistake: Setting CORS headers on
GET/POSTbut forgettingOPTIONS. Browsers send a "preflight"OPTIONSrequest before certain cross-origin requests, and if that preflight doesn't return the right headers, the browser blocks the real request before it's ever sent — even if yourGEThandler would have worked fine.
If you need CORS applied consistently across many routes at once, handling it in proxy.ts (formerly middleware.ts) instead of repeating this in every file is usually cleaner.
Route Resolution Rules to Know
A few quick rules worth keeping in mind as your API grows:
- A
route.tsfile cannot exist at the same segment as apage.tsx— pick one per route. - Route Handlers do not participate in layouts or client-side navigation the way pages do. They're the lowest-level routing primitive — pure request in, response out.
- Each
route.tstakes over every HTTP verb for that exact segment. A nested dynamic segment likeapp/[user]/page.tsxnext toapp/api/route.tsis perfectly valid, since they're different paths.
| Page | Route | Result |
|---|---|---|
app/page.tsx | app/route.ts | ✗ Conflict |
app/page.tsx | app/api/route.ts | ✓ Valid |
app/[user]/page.tsx | app/api/route.ts | ✓ Valid |
Frequently Asked Questions
Can I use Route Handlers with the Pages Router?
No — Route Handlers only work inside the app directory. If your project still uses pages/, you'd build API endpoints with the older pages/api convention instead, which behaves differently (Express-style req/res rather than Web Request/Response).
Do I need Route Handlers if I'm already using Server Actions?
Not necessarily — plenty of apps only use Server Actions for internal mutations. Reach for a Route Handler specifically when something outside your React component tree needs a callable URL: a webhook, a public API, or a request from a non-Next.js client like a mobile app.
Why isn't my GET Route Handler getting cached?
Route Handlers are dynamic by default. You need to explicitly opt in with export const dynamic = "force-static", or — if you're on Cache Components — make sure the handler doesn't touch runtime APIs like cookies(), headers(), or an uncached database call.
Can I return something other than JSON?
Yes. Response and NextResponse can return any body type — plain text, HTML, a file buffer, even a streamed response. Just set the appropriate Content-Type header so the client knows how to interpret it.
How do I protect a Route Handler so only logged-in users can call it?
Check the session inside the handler itself, the same way you would inside a Server Action — never rely on proxy.ts/middleware alone as your only line of defense. Most auth libraries (Clerk, Auth.js) expose a server-side helper you can call at the top of your GET/POST function to verify the request before doing any real work.
💡 If you haven't set up auth yet, see our guides on Clerk or Auth.js (NextAuth) for the full setup.
Do I need a specific TypeScript version to use Response.json()?
The static Response.json() method (used throughout this guide) wasn't always typed in TypeScript's DOM library definitions — it was added after runtimes like Node.js had already implemented it. If you're on an older TypeScript setup and see a type error on Response.json(...), update TypeScript, or fall back to the always-supported pattern:
new Response(JSON.stringify(data), {
  headers: { "Content-Type": "application/json" },
})
Wrapping Up
Route Handlers are the App Router's answer to "I need a real, callable HTTP endpoint" — whether that's a public API, a Stripe webhook, or a small internal utility route. The mental model is simple once it clicks: a route.ts file, named exports per HTTP method, and the standard Request/Response APIs doing the actual work. Layer in dynamic segments, caching with "use cache", and CORS headers as your API grows, and you've got everything you need to build a production-ready backend without leaving your Next.js project.
From here, a natural next step is pairing your Route Handlers with Zod validation for safer request parsing, or wiring one up as a real webhook receiver following the Stripe pattern above.
Continue Learning

 Reddit
 WhatsApp
More in Next.js Fundamentals
View AllMUI v9 Theme Setup in Next.js 16: Full 2026 Guide
Learn the correct MUI v9 theme setup in Next.js 16 App Router — cache provider, custom theme, dark mode, and Google Fonts, step by step.
Next.js Cache Components Migration Guide (2026)
Migrate to Next.js Cache Components — enable cacheComponents, replace revalidate/fetchCache with use cache and cacheLife, and fix Suspense errors.
Server vs Client Components in Next.js 16 (2026 Guide)
Learn when to use Server Components vs Client Components in Next.js 16 App Router, with real code examples, common mistakes, and a clear decision framework.
Error Handling in Next.js 16: The Complete 2026 Guide
Learn error handling in Next.js 16 with error.tsx, global-error.tsx, not-found.tsx, Server Actions, and Route Handlers — with production-ready code.